Thursday, February 24, 2011

Digs for Grandma H

The Hubby's sister has been planning and plotting to be able to get GG into her home so she can watch over her a little better now that Grandpa has moved into an assisted care facility. 
An add-on to Aunt T's house is going to provide Grandma with a little more company in the years to come. Here we have a pix of the new kitchen area.
There's a living room, bedroom and large bathroom.  Very nice for her to probably move into this summer.
Good job Tone.

Wednesday, February 23, 2011

Coach Steph

Our little girl is turning into a real coach trying to figure out how to best play her volleyball team members, adjust all their positions, make sure their camaraderie is improving, and keep the girls happy as they practice and play in tournaments.
Last weekend they played in Las Vegas and she was slightly frustrated.
...Not really, she was actually extremely frustrated.
I just thought it was cute.
After playing ON a club team all through middle and high school, she is now the adult and experiencing the club scene (yes, this is her version of the club scene) from the other side.
You go girl!

Monday, February 21, 2011

Green Sweater for My Boy

Such a cute little guy, I thought I'd knit him up something to keep him warm.  I have been trying to sew more lately and so my knitting has been slower than usual.  I finally finished this little sweater, then the Hubby said, "Really?, You think that's big enough for him?"
Well, this little/big guy came over last night and alas, the sweater is not going to be his. It'll just have to be stashed in my cupboard for a littler guy to come along. 
Here are the pieces all laid out before sewing them together.  I just have the shoulder seam done in the top pix.  Then below are the "blocked" sleeves.
I think the one thing that helps a sweater in the final stages look less homemade is the blocking of it before being sewn together.
Just lay out the pieces and spray with water, then pin and measure all the way around each piece to fit the sizes printed on the pattern. This makes everything lie flatter and sew together more easily.
I let it dry overnight and sometimes steam the pieces if they are curling up around the edges more than I want them to.
All finished with some ordinary buttons.

I supposed I should look at the bright side and say, "I'm done with a gift for a later time and child."

Fun, Fun.

Monday, February 14, 2011

TV Shot

My SIL has a father that is a supportive fan. He took this picture off of his big TV, of Michael shaking Jimmer Freddette's hand after the first game of Utah vs BYU. Jimmer had just scored 47 points on Michaels Utes. 

If you can look it up and check out all the comments made to my SIL it is pretty funny. Comments from people who don't know my son as well as people who are related to him. We thought it was quite entertaining.
Facebook has an interesting medium for all kinds of things.

PS: I guess you have to be Austin's friend to be able to see it.

Long-Term Project

My Mother's favorite color is light-blue with a hint of turquoise.
I grew up in a house with turquoise master bathroom fixtures (remember it was in the 60's),
and the rock on the side of our cream colored brick home, built in 1960 also, was an accenting turquoise called "Aztec Mist" if you look up decorative rock.
Some day I'll take you to my childhood home again.
For now I'll show you the lacy pi shaw that I am knitting for my mother right now.  It is done with some tensel lace weight yarn and will use nearly 3000 yards of the stuff. Every other row I just knit each stitch without thinking much, but then the opposite rows are a little complicated so the design will work and I have to concentrate for about 30 minutes to get through one row. (that is right now when there are about 400 stitches on each row, but as I add to the circle 16 more stitches every few rows, the time and stitches will increase greatly)  1000 stitch, complicated rows will take me at least an hour or two per row to complete.
So... I am making this slowly. I don't have time to think that much. :)
It will be pretty when I am able to finish it.
Right now it is in a bunched up circle.
....Later.... WAY later.

Sunday, February 13, 2011

Quite a Rivalry

Our University of Utah basketball playing son got us tickets to the U of U @ BYU game yesterday and we were not disappointed.  Gotta love the BYU Marriott Center for the loudness factor as well as the total showtime atmosphere of the place.
Michael said the student section was full before he and his U of U teammates even arrived on site.
This large student section that is so high on their Jimmer Freddette is so NOT high on the U.  They had some funny and imaginative posters for their team, as well as some not nice ones for the Utes.
"Class it up a little," were my thoughts in a nutshell.
Going up for a warm-up layup. He doesn't play in the games, but he is helping his team become better on a daily basis. M has a great attitude and work ethic on the practice court and I believe he is good for the teams emotional and physical dynamics. He knows the game well and can be anyone he is asked to be for the scouts in practice. The coach welcomes him to play all 4 years even if he doesn't play in the games.
Michael's team stayed with the heavily favored Cougars until the last quarter and held Jimmer to 8 points until that time. Then ... Jimmer and his Cougs took off.
This is the last game where the 2 teams are playing for conference standings, as next year they both switch conferences. I'm sure their rivalry will remain, but truly the games aren't going to mean as much in the future.
We were proud of our boys.
The crowd was proud of their boys.
Stephanie and Michael couldn't believe the electricity in the arena. It really took me back. My big brother played for the Cougars before they were in the Marriott Center in the early 70's, and I have lots of memories going to the Smith Field House as a young girl. I also have memories of when I was a student there at the "Y".
Lots of fun.

Friday, February 11, 2011

Wintertime?

Northern California during an unseasonably warm winter looks something like this,
and this,
 and this.
So why is it I continue leaving my beautiful yard with its blooming camellia's, magnolia's, daffodils and more, to fly to negative 15 degree chill factor Denver, and then back to Salt Lake where it is a more balmy 22 degrees?
"I am a mom."
Good answer!!!!  Yeah!!!!

Wednesday, February 9, 2011

Katz Wool Vest

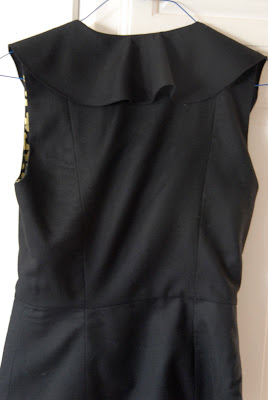
My DD found a very cute Anthropology vest and wanted me to duplicate it for her.
I said I'd look for some wool when I went to NYC in December, which I did, and then I figured it out.
I took an old Butterick pattern 3118 that I own for a jacket.
This pattern apparently came out in 1989 and I think I bought it around 1990 for a very cute Christmas suit that I made for myself.
I found this picture in my 1990 photo album. It was taken in our Clackamas, Oregon living room. Who are those people?  I think this was the first time I saw my husband in a tuxedo. That may be a story for another time, but I digress. I loved the brocade this jacket was made out of and I made 3-4 y/o Kathryn a dress with it too.

If you read my blog, you may remember I went shopping in the garment district in NYC and it was a very fun experience shopping at Mood Fabrics. I found some medium weight black wool that would make up beautifully.
So I made the vest using this old pattern and making each piece to the waist. Then I made a peplum type thing in all of the front, side and back pieces and attached them to the main body. I self-lined the peplum with the same wool fabric, and lined the main body with a very fun silk black with yellow circles intermixed.


The ruffle down the front is single fabric and ungathered. I cut out two 20 inch diameter circles (which is the length of the seam from the center front to the center back), measured out 5 inches from the outline of the circle for the ruffle including the seam allowances. This created a round 5" wide band that I sewed together at the back seam. I rolled hem finished the edge for finish and then sewed it onto the seam allowance. Cutting it into a round shape gives it extra fabric along the non-seamed side, therefore ruffling it without gathering.

My DD looks so cute in it. Sometimes my photography skills leave something to be desired.

Sunday, February 6, 2011

Our Yellow Girl

My DD kinda does colors for her children. For instance, her first born has a yellow nursery, (along with the black and white things that will always stay in the nursery). Her #2 daughter has added lavender to the nursery and also has more accessories in the light purple that is lavender. Look at the previous post to see this little angel in a light lavender tutu.
Well, #1's 2nd birthday came and it is time to take a picture in a little yellow dress for the family wall.
Katz wanted a simple little dress/jumper, with a couple pleats down the front.
This is what we came up with.
I like the curved yoke, and I just drew it onto the top of the pleats and cut it out with a seam allowance.  I used to think there was no way I could do something like that, but after seeing how many novice sewers on blogs don't use any pattern at all, I figured I can make up a few things. And it worked.
The Hubby shot lots of cute pix. Good job hun.

Saturday, February 5, 2011

Little Ballerina

This is the latest 6 month old ballerina in my life.
What a cutie, eh?
I made the tutu with about 10 inch lengths of lavender tulle, folded them individually in two and looped it onto an elastic waist band over and over. Lots of tutorials on how to do this. Here is one. No sewing in this project, and it takes about an hour.
Easy peasy.

Wednesday, February 2, 2011

Tutu's 4 All (Pettiskirt)


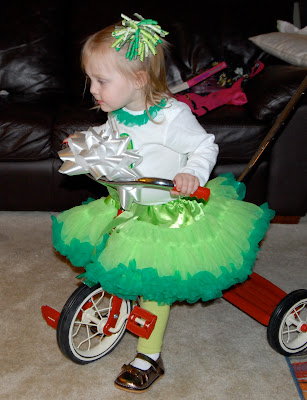
I started making ruffled pettiskirts before L's b-day in November, and continued through November for all the little granddaughter's Christmas presents as well. I used information and written instructions from a blog called "Make It and Love It", and ordered the non-fray chiffon fabric from AFC-express.com
You can make hundreds of variations of the skirt, because the chiffon comes in 30 solid colors, several animal prints, and a few other prints too.  All the little girls love them. Heck, all the big girls wish they could wear one too.
I varied the instructions a little and here is what I think works best for me in the construction of these little pettiskirt/tutu's.

1. The "make it and love it skirt" is sewn from the bottom up. Mine is a TOP - DOWN version because that way I don't have to measure the ruffle amount exactly. I can just gather - sew the chiffon onto the subsequent top ruffles until the row is finished. This saves me oooooooodles of time and  maybe uses a little more or less chiffon in the making depending on how I have the gathers set up.


2. I use an awesome RUFFLER/PLEATER ATTACHMENT on my sewing machine that sews the seam and gathers the top fabric at the same time.  Did I say it is amazing, stupendous, and just plain cool? It is a little spendy as machine feet go (about $100.00),  but if you are making more than 3 or 4 of these pettiskirts it is worth it. Here is a picture of one of these feet. A pretty complicated piece of metal don't you think?
I'll show you in this video, just how the ruffler works.
Now really, .... is that not a cool tool?
So to insert your fabric layers into the ruffle/pleater, you first place your fabric to be gathered between the top metal slider and into the grove of the foot. You then place your fabric that is not to be gathered underneath the first fabric right sides together and under the foot completely. Lower the presser foot and begin sewing. Large basting type stitches make bigger pleats if you want that, and smaller stitches make the pleats smaller.  On the front of the r/p foot near the top where it is closest to the actual machine, is a slider that you can move to gather every 1 stitch, or every 6 stitches, or every 12.  These, of course would use less yardage and make fewer pleats out of the roll of chiffon.
I made a skirt to fit my 5 y/o granddaughter first, then made the subsequent skirts smaller for the 2 and 3 y/o's.
The non-fray chiffon fabric rolls come in several different widths, so size it accordingly for the length of skirt you want to end up with.  These skirts are 3 + layers long doubled, so for the the 5 y/o size you will need 8"x 40" of satin for the top waistband area of the skirt plus 5" rolls of chiffon for the two layers (x2) under the satin layer(s) plus 2" chiffon roll for the bottom "fluff" layer.
This fluff layer is made from the zebra chiffon. The other half of this particular skirt has blue fluff so the two layers lay on top or bottom of each other depending on which side of this reversible skirt is on top.
I started with my satin fabric which I'll call the 1st layer, then ruffle stitched the 5" chiffon around each edge of that layer making 2 second layers that were gathered from about 120" each onto the 40 inch satin.  I then stitched another 3rd layer onto each of the 2nd layers just gathering the 3rd from about 360" down to the 120" straight 2nd.
This skirt is made up of 6"(3") satin layer, 3" 2nd layer, 4" 3rd layer and 2" fluff.
At the end of each seam where the circle is complete, I just overlapped an inch or so to leave no gap.
Nearly finished, except the last blue layer of fluff.
Finally, the skirt is finished by sewing the 2" fluff layer to the 3rd tiers of the skirt. The fluff is gathered down the center and sewn with both right sides up. (You need about 50 yards of 2" chiffon - that is one reason you want to buy your chiffon pre-cut)
Such fun little skirts for young girls.
And apparently good little party skirts too.
Crazy Grandma, huh?